
Ocean Glow Show!
I had no idea that so many people would want to know how I did the Ocean Glow Show! After thousands of clicked likes, shares, emails, and messages, I finally have it all here for your reading and watching pleasure. Enjoy!
I have done a lot of art shows in my years of teaching art to elementary students but none as satisfying as the Ocean Glow Show. After watching my Tik Tok below, you’ll see why. Follow and like HERE!
The kids go crazy over the glow show. I mean they LOVE IT. And I get “glowing” (HA!) reviews from administrators, parents, brothers, sisters, grandparents, aunts, uncles and whoever comes to experience the show! Some kids even said it was like DISNEY WORLD!!!! What?! REALLY? It kinda was… I’m not gonna lie.
WHAT MAKES IT GLOW?
The Short answer? Science! The long answer? Phosphor-containing art materials shown under highly energetic UV light also known as black lights. You can get your geek on and read all about it in this fascinating black light article/lesson from ScienceWorld.com!
WHAT MATERIALS DO YOU NEED?
You will need black lights and art supplies containing phosphor. Most neon and fluorescent art materials will work, but not all! So I always test my supplies with a blacklight flashlight. These are the lights I use below.

Pictured Above: Onforu 4-pack 27w LED Black Lights Blacklight Flashlight 2-pack
ART SUPPLIES
I have used many different “glowing” art supplies and some work great and some, eh. Below are the affordable, yet super effective, art supplies I use for a glow show. CLICK below the image for links to Amazon.
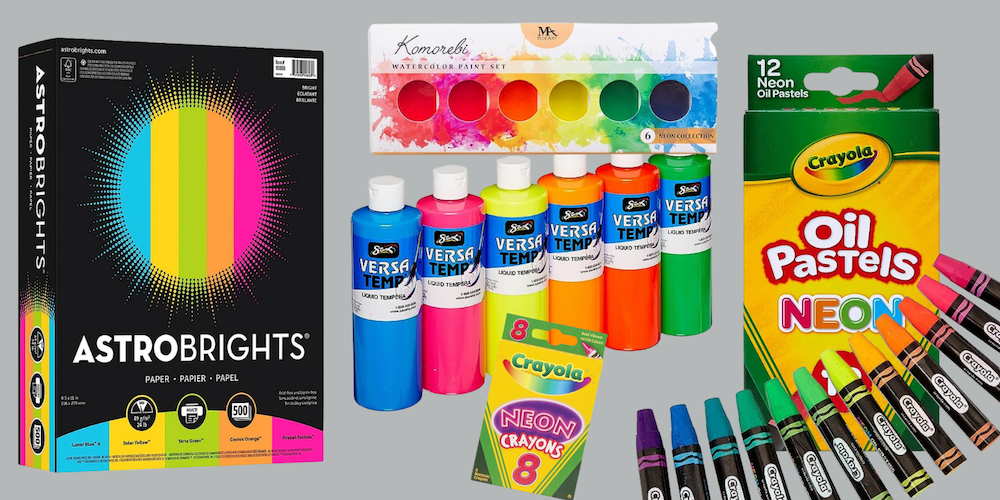
Pictured above from left to right: Astrobrights Paper, Komorebi Watercolor Paint Set, VersaTemp Tempera Paint, Crayola Neon Crayons, Crayola Neon Oil pastels.
*It is worth noting that the yellow paper from the Astrobrights paper did not glow much at all. The other colors were GREAT!
LOCATION. LOCATION. LOCATION.
Where to put a glow show is important because there should be minimal light. For example an old hallway, the basement, or an old classroom would be good spots. You will have to cover any windows. I am super fortunate because our school has a GIANT hallway (~50 yards) that leads the kids to the gym and the cafeteria. It has no windows and has nothing on the walls so it is the PERFECT place to have the glow show.
MUSIC
If you are in the planning phase of having a glow show, consider adding music! I added all kinds of ocean-themed music playing on a large JBL speaker (my own) and it was FABULOUS!
Here are the songs I used: Hawaiian Roller Coaster Ride by Mark Keali’i Ho’omalu, Disney’s Under the Sea, Beyond the Sea by Bobby Darin, Come Sail Away by Styx, F.U.N. Song by Spongebob Squarepants, Yellow Submarine by the Beatles, The Sound of Sunshine by Michael Franti &Spearhead, Baby Shark by Pinkfong and Surfin USA by the Beach Boys.
THE PROJECTS
Here I share written directions, links to materials, my YouTube videos and activity sheets that I use for each project. Here are the projects I do for each grade followed by photos and directions.
Kindergarten: Hanging Jellyfish using Pointillism (3D)
1st grade: Hanging Stuffie Fish with Patterns (3D)
2nd grade: Oil Pastel Pattern Fish (2D)
3rd Grade: Hanging Mandala Fish (3D) AND Impressionism Seahorse (2D)
4th Grade: Notan Art Sea Animals (2D) AND Zentangle Turtle or Lobster (2D)

Pictured Above: Hanging Jellyfish using Pointillism & Hanging Pattern Fish. Directions below!
HANGING JELLYFISH using Pointillism
Materials:
Aluminum foil cut into circles (around 8-10 inches in diameter)
Paper cups, coffee lids, or something similar
Paper punch
Aleene’s Tacky Glue or something similar
cotton ball, q-tip or paintbrush for dots
Neon yarn
Directions:
Prep first (afterall, this is a kindergarten project!) Punch 6-8 holes around the rim in each cup or lid (for the yarn and streamer tentacles!). Cut out aluminum foil circles (8-10 inches diameter - I cut several at a time!) Cut strings of yarn and streamers long enough to thread through the holes.
Show students a Georges Seurat pointillism painting that is made with ALL DOTS. Have kids paint the entire circle like Mr. Seurat. Let dry.
Pass out yarn and streamers. Have students thread through the holes. Make sure they pull through the hole far enough so it doesn’t fall out!
Glue aluminum foil circle to the top of a paper cup or coffee lid.
Glue a open paper clip to the top. Before you hang them, bend the paper clip up so it makes a hook.
Hang them up and turn on the black light!
HANGING STUFFIE FISH with Patterns (Youtube Video HERE)
Materials:
Color Diffusing Paper cut in the shape of a fish (I have a die cut machine at school)
OR these Sea Life Shapes I just discovered while writing this!
Sharpie markers
Plastic sheet, aluminum foil, or lamination ends (needs to be waterproof)
Stapler
Spray bottle
Paper for stuffing (brown paper towel, tissues, paper towel etc.)
Directions
Prep first - cut out fish shapes from the Color Diffusing Paper Sheets or buy the Sea Life Shapes. Note: each student will need TWO of the same shape so you can staple around the edges (kind of like sewing) and they can stuff with paper. You might need an extra pack or two.
Do my AmyWardCreates Youtube lesson on patterns. It is for this project and I made it during Covid and I still use it! (Score 1 point for Covid!) Students will make their own patterns on both sides of their fish or ocean animals.
Pass out the plastic sheet and the neon watercolor paints and have them paint over their sharpie marker patterns. LEAVE THEM ON THE PLASTIC SHEETS TO DRY OVERNIGHT! This way the color will soak into the diffusing paper.
Put the two sides together and staple all along the edge. Leave an opening.
Have students gently (ha! Really?) stuff their animal with tissue or paper towel.
Close the opening with glue or a stapler.
Add a string and a paper clip hook for hanging.

Pictured Above: Oil Pastel Pattern Fish. Directions below!
OIL PASTEL PATTERN FISH
Materials:
Pencil
Scissors
Directions:
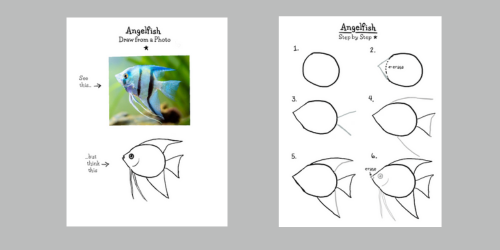
Have your students use a pencil do a drawing of a fish. Depending on their age, you can do a guided drawing, drawing from a black line drawing, or from a photo. Here is my drawing pack “Learning to Draw from a Photo” that I start in 2nd Grade. (see image above!)
Use oil pastels to outline the fish drawing.
Using shapes and lines (here are the posters from my classroom that I use), make patterns on your fish. Here is the Youtube video that I use to show pattern for my very young students.
Make sure students are putting down a thick layer of oil pastel. I demonstrate a light line or shape (looks like crayon) versus a dark oil pastel line or shape (looks like paint).
Using watery neon watercolor paints, students paint over the oil pastel coloring in the fish.
Dry completely.
Cut out and display.
Helpful tip: After the art show, students will glue their fish to a background that they make using watery watercolor paint and plastic wrap crinkled on top.

Pictured Above: Hanging Mandala Fish (3D) & Impressionism Seahorse. Directions below!
HANGING MANDALA FISH (Youtube Video for Mandalas HERE)
Materials:
Cardstock or heavy construction paper (I cut to 11 by 17 and copy using THIS PATTERN).
Black Sharpie marker
Scissors
Glue (we use glue sticks)
Directions:
Photocopy fish template onto cardstock or construction paper. Encourage students to change the shapes of the fins if they wish.
Using neon tempera paint, have students paint the blank side anyway way they want. Let dry.
Cut fish apart from the fins on the dotted line. Paint the other side of the fins since both sides will show.
While that is drying, students use Sharpie markers to make mandalas on the fish for each member of their family or people important to them. Here is my lesson on Youtube showing how I teach this (done for Covid). Note: It was for a lizard but I changed it to the fish for the Ocean Glow Show.
Fold fish in half diagonally, and cut the dotted lines to make the fish “bend”.
Glue fish together.
Glue fins in the appropriate spots on the fish.
Add an opened paper clip and hang up!

IMPRESSIONISM SEAHORSE
Materials:
neon oil pastels
cardstock or white construction paper
scissors
Directions:
Have your students do a drawing of a seahorse. Depending on their age, you can do a guided drawing, drawing from a black line drawing, or drawing from a photo. Here is my drawing pack “Learning to Draw from a Photo” that I start in 2nd Grade. (see image above!)
Using oil pastels, have students trace their seahorse.
Using oil pastels, have students color in their seahorse using dots (Seurat), dabs (Monet), or lines (Van Gogh). Students need to make sure they are using several colors to color in their seahorse.
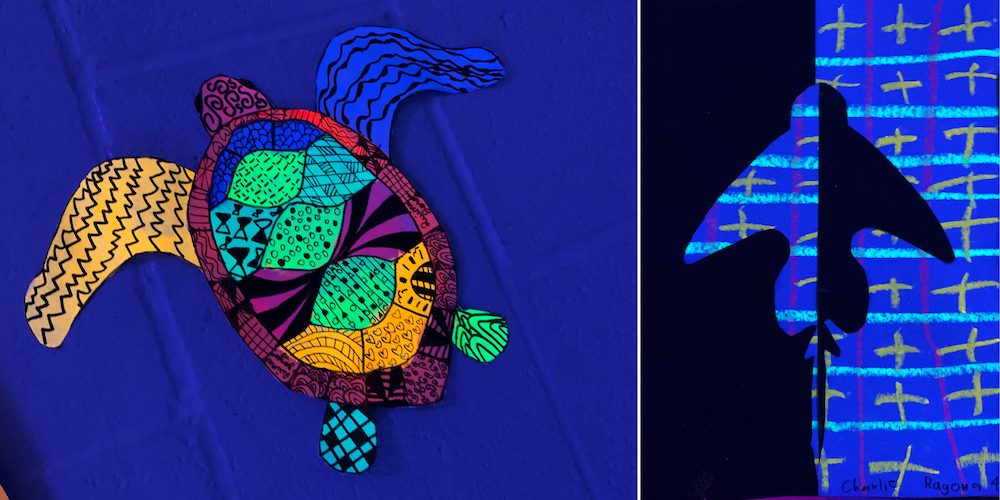
Pictured Above: 4th Grade Zentangle Sea Animals 4th Grade Notan Sea Animals

ZENTANGLE OCEAN ANIMAL
Materials:
Watercolor paper
Neon watercolor paint
Black sharpies
scissors
Directions:
Have your students do a drawing of a turtle. Depending on their age, you can do a guided drawing, drawing from a black line drawing, or drawing from a photo. Here is my drawing pack “Learning to Draw from a Photo” that I start in 2nd Grade. (see image above!)
Outline in black Sharpie marker. In each section, make a different pattern or zentangle. Teacher tip: I tell my students that the less white paper showing, the darker the space will look. I show them examples.
Next, watercolor paint over the Sharpie.
Cut out and hand on the wall.
NOTAN ART
Materials:
Colored neon paper ( I use Astrobrights 8.5'“ by 11”)
Computer paper (8.5” by 11”)
Black paper the same size (I cut black construction paper to 8.5” by 11”)
Paper clips
Oil pastels
Chalk
Scissors
Directions:
Prep first: Cut the black paper in half. You can do this vertically or horizontally depending on what animal you are going to make. For example, if I were doing the turtle, I would draw it vertically (like a door, not a window). Note: Symmetrical animals like turtle, octopus, lobster etc. work best.)
Choose a full sheet of neon paper. This will be the background paper.
Make a pattern over the entire page.
Use the computer paper to draw an animal right in the middle. Outline the outside edge only with a dark marker or highlighter. This will make is a silhouette.
Fold it in half on the line of symmetry and cut it. Throw away the half you aren’t using.
Use paper clips to attach it to a half sheet of black paper so you can cut it out.
Cut out the outside edge.
Glue on the negative piece first. Place the positive piece back inside the negative and then flip it over the line of symmetry.
Flip the positive half over the line of symmetry and glue in place.
FINAL WORDS
The Ocean Glow Show has been one of the highlights of my time as an art teacher. I thought parents might object to everyone in the grade doing the same project but it was quite the opposite. They loved seeing the variety and interpretations their child took on the projects. The theme of “OCEAN” seemed meld it all together.
If you have any questions, contact me through FaceBook, Instagram, or TikTok. Or even here! I’ll do my best to answer in a timely manner!
Happy Creating!
Amy, AKA Mrs. Ward, AKA Mrs. Draw